In this article, you will learn how to extend C drive in Windows 10 without software. This problem is one of the scaring issue. Because, you may face this problem after installing many software. Further, there is no space to install any software. However, there are many solution of this problem as well. For example, extend C drive in Windows 10 without formatting and increase C drive space in Windows 10 without formatting is extended with software.
However, the main problem of the software is either to get the license or use the trail version. Further, to install third party software sometime is harmful for the computer as well. Therefore, as much as you can avoid installing software to operate changes is best practice. Because, you can save both money and time.
Therefore, in this article I will show you a way to extend C drive in windows 10 without software. However, it is not only limited to Windows 10. But you can use same procedure for Windows 8.1, 8, 7, Vista and XP as well.
However, if you are out of storage in your all drives. I recommend you to get new external hard drive. Where you can simply transfer all your data. Further, you can extend C drive without any problem.
Extend C Drive in Windows 10 Without Software
How to Extend C Drive in Windows 10 without Software
Simply follow the steps below to Extend C Drive in Windows 10.
Contents
- Step 1. Create and Format Hard Disk Partitions
- Step 2. Space in D Drive
- Step 3. Check Free Space in D Drive
- Step 4. Shrink Volume
- Step 5. Create New Volume
- Step 6. Secure Data
- Step 7: Delete Volume
- Step 8: Extend C Drive in Windows
- Step 9: Check the Extended C Drive in Disk Management
- Step 10: Video Guide to extend C Drive in Windows
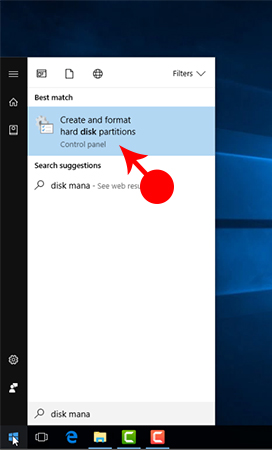
Step 1. Create and Format Hard Disk Partitions
You have to Click on Windows Button. Then you have to write Disk Management. Further, you will see Create and Format Hard Disk Partitions. Therefore, you have to Click on it.
Disk Management
Step 2. Space in D Drive
Now you will see Disk Management windows. Therefore, you can check out how many Volume or drive do you have. Then check the D drive space. Further, it is important that the free space must be more then used space. Because, You will make a new drive from the free space. Then you will copy the all the file (used space) from the D drive to the new drive. I assume the new drive is E drive.
Step 3. Check Free Space in D Drive
To check free space you have to go to This PC. Therefore, you have to click on Start and write This PC. Then click on it.
Further, you will see D drive. Then you have to right-click on D Drive and go to Properties.
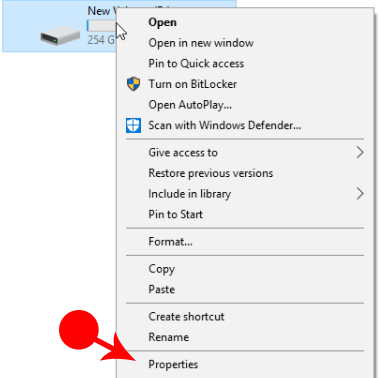
Drive properties
Then you have to check the used and free space in your D drive.
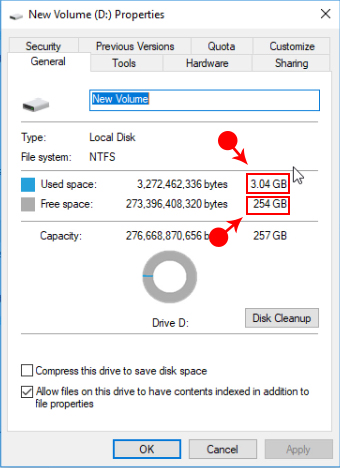
Space in Drive D
Step 4. Shrink Volume
Once you have found that you have enough free space in D drive. Then, you have to shrink the volume to new drive. Therefore, you have to make new drive with the space more then used space in D drive.
On Disk Management windows. You have to right-click on D drive. You will get different option. Therefore, you have to click on Shrink Volume.
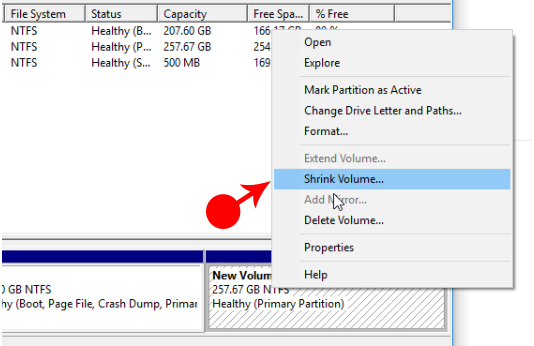
Shrink Volume
Now you have to get shrink window. Therefore, there are many information which you can get for your D drive. But, you have to check Enter the amount of space to shrink in MB. Since the space is in MegaByte (MB). But, you have to calculate that in GigaByte (GB)
However, 1GB is equal to 1024MB i.e 1GB = 1024MB. Therefore, if you need 10GB. Then you have to multiply 1024 with 10 which is equal to 10240. It means 10GB is equal to 10240MB.
Now you have to write the number to the text field and click on Shrink.
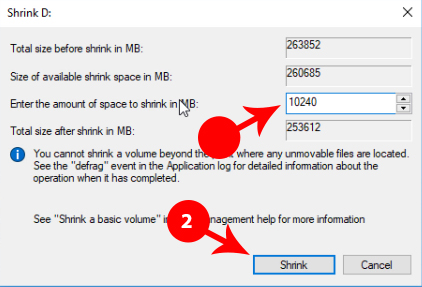
amount of space to shrink
Step 5. Create New Volume
Now you will see new partition will the space which you have enter. However, under the memory space there is written Unallocated. It means that you cannot use it now. Therefore, you have to Create New Volume by right-clicking on the partition. Further, you have to click on New Simple Volume.

New Simple Volume
Further, you will get new Wizard. However, the first page is welcome. Therefore, you have to click on Next.
Then you will get Specify Volume Size. Therefore, you have to click on Next.
Next, you have to Assign Drive Letter or Path. However, you don’t have to do anything. Simply click on Next.
Further, you will get Format Partition. However, you have to click on Next.
Finally, you have completed the new simple volume wizard. Therefore, you have to click on Finish.
Step 6. Secure Data
You will now see new drive. Therefore, you have to copy all your files from the D drive to the new created E drive.
Note: In case you don’t copy or back your file. You will loose all your data after this step. Therefore, you should carefully, all your important and valuable data.
Step 7: Delete Volume
After completely secure your data. Now it is time to delete partition. Without deleting the volume You can’t extend to C drive. Therefore, right-click on D drive. There is an option Delete Volume. You have to click on it.
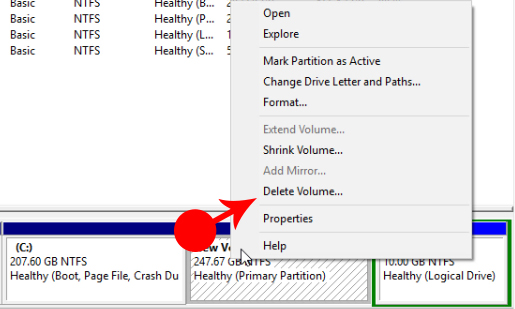
Delete Volume
Further, it will warn you to delete this volume will erase all data on it. As you have already copied all your data. Therefore, you have to click on Yes.
Step 8: Extend C Drive in Windows
It is perfect time to extend c drive in windows. Therefore, you have to right-click on C Drive. Then you have to click on Extend Volume.
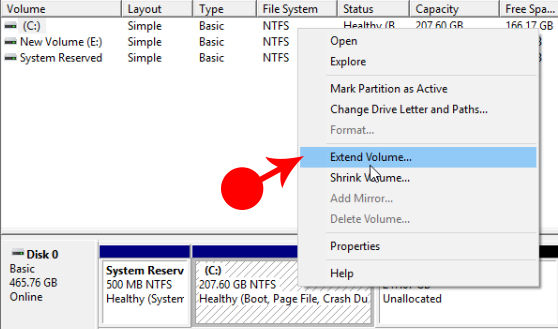
Expend C Drive in windows
You will get extend volume wizard. Therefore, on the first page of wizard which is welcome page. You have to click on Next.
Further, you will get Select Disks volume. Therefore, you have to click on Next without changing anything.
Finally, you have to click on Finish.
Step 9: Check the Extended C Drive in Disk Management
Congratulation you have configured and extended the C drive perfectly. You can check now C drive space in Disk management. You have see the capacity is more then before. Now enjoy more installing different software and games.
Step 10: Video Guide to extend C Drive in Windows
Still you are confuse and don’t know how to deal with all these steps. Then don’t worry, you can follow the completely video guide below to extend C drive in windows 10.
Conclusion: I hope you have configure all the setting. Further, if you have any problem Don’t forget to write in comment box below. However, If you have to write your opinion or want to add more valuable information regarding this article. You are most welcome. Thank you.