In this article, you will learn how to use DSLR Camera as a webcam for Zoom and Skype. Further, you can also use that for streaming in Facebook Live. Therefore, I will explain complete details using both Windows and Mac operating systems. It means both Mac and Windows users can benefit from these tips and tricks to convert and use a DSLR camera as a webcam.
Below I will show you different methods to make your DSLR camera as a webcam. Where you will easily use on any online platform. However, you will also get useful effects to apply directly to your video. Such as to change the background of your video for a more productive and creative virtual environment. Therefore, you will engage more people while you are talking or giving a lesson to your students.
Why Use DSLR Camera as a Webcam?

How to Use DSLR Camera as a Webcam
There are many reasons, why to use DSLR camera as a webcam. Let me explain one by one.
First, you have a DSLR camera but you don’t have a webcam. Therefore, you don’t want to expend extra money on webcams. Instead, you are going to use your current DSLR camera as a webcam. Therefore, you are good to use DSLR camera as a webcam.
Secondly, a DSLR camera is amazing, the way it captures videos and images. The result is superbly sharp and outstanding as compared to any expensive webcam in the market. Therefore, most of the people love to use DSLR camera as a webcam.
Further, in DSLR camera we can use any lense which you want for better videos. Therefore, you can use your DSLR camera in manifold ways to get better video quality on Skype and Zoom Meeting.
Similarly, with DSLR camera you can use the manual setting for ISO, Shutter Speed, and aperture. Therefore, you can control all the camera setting to optimize the result while using as a webcam.
If having all these amazing qualities then it is batter to buy DSLR camera instead of any best quality webcam.
Contents
- Step 1. Install Driver to Use DSLR Camera as a Webcam
- Step 2. Install OBS Studio
- Step 3. Install OBS Virtual Cam
- Step 4. Configure OBS For Webcam
- Step 5. Your OBS Webcam is Ready
- Step 6. DSLR Camera as a Webcam for Zoom
- Step 7. Use DSLR Camera as a Webcam For Skype.
- Step 8. Use VirtualCam on Facebook Live
- Step 9. Video Guide
- Why OBS VirtualCam as Webcam?
Step 1. Install Driver to Use DSLR Camera as a Webcam
When you are going to connect DSLR camera on windows or mac. Then you have to install the driver for your camera. Therefore, first, you have to connect your camera to the system. Then you have to install the driver. Hence, if you don’t install the driver. Then you will face some problems while using DSLR Camera as a webcam.
Step 2. Install OBS Studio
OBS is open broadcaster software which is completely free. Further, you can use it in any platform using Windows, macOS, and Linux. OBS has amazing functionalities where you can live stream and also record your screen for YouTube and Facebook etc.
Hence we are going to use OBS for DSLR camera and use it as a webcam in different software like Skype, Zoom, and Facebook live.
1. Download OBS
First, you have to download OBS. Therefore, check the link below to download OBS Studio
2. Install OBS Studio
After downloading you have to install the software. The installation is very simple likewise all other software. Therefore, you have to go through all wizard pages and with proper instruction, you have to install OBS.
Step 3. Install OBS Virtual Cam
Now you have to install OBS Virtual Cam plug-in. Because that is the one which makes OBS as a webcam. Therefore, anything which will be in your OBS screen will be displayed in webcam using anywhere like Zoom, Skype, Facebook, or YouTube.
1. Download Virtual Cam
First, you have to download Virtual Cam. To download virtual cam plug click on the link below
2. Install Virtual Cam
After downloading. You have to install the EXE file. Installation is simple. Therefore, you can easily install the plug-in.
Step 4. Configure OBS For Webcam
Now you are completely ready to configure YouTube webcam using DSLR camera.
1. You have to open the OBS Studio.
2. On the top menu, there is Tools. Click on it. Then you will see VirtualCam.

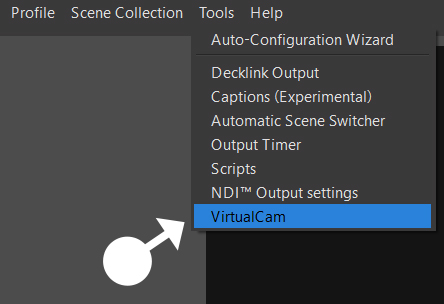
OBS VirtualCam
3. Further, you will see VirtualCam Windows. There are many options. However, you only need to click on Start.

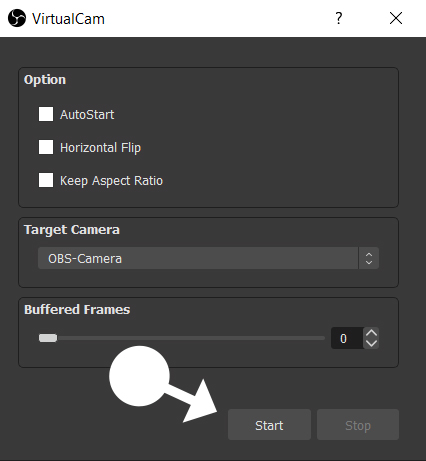
Start VirtualCam
Step 5. Your OBS Webcam is Ready
You have successfully configured every setting. Therefore, it now time to test in various applications. Therefore, we are going to use Virtualcam on different platforms. Let’s check one by one.
Step 6. DSLR Camera as a Webcam for Zoom
You can use the VirtualCam for Zoom for any platform. Either it is for a host or student. I will show you both procedures below
a. Host
1. First, you have to open the Zoom application.
2. Then you have to click on Setting

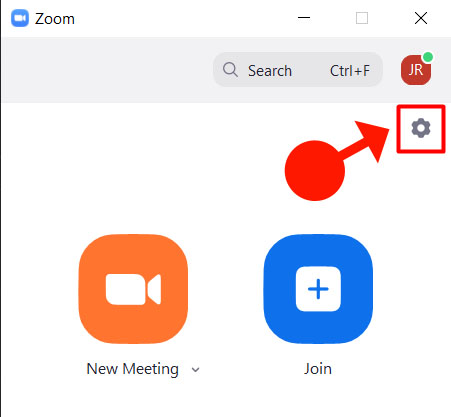
zoom Setting
3. Now you have to click on the Video from the left menu. Further from the drop-down menu, You have to click Camera and select OBS-Camera.

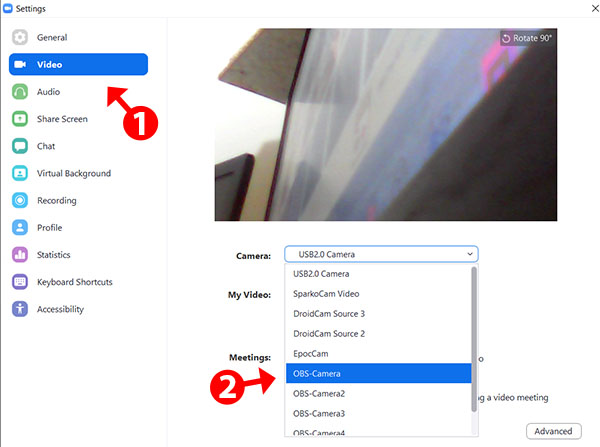
Zoom Camera Selection
That’s it. Now you can start the Zoom meeting and you will see OBS-Camera as webcam.
b. Student
First, the student must enter the room. When you are going to enter the room. Then you will find an option for the Video. Further, you will find a small arrow. Therefore, you have to click on that. Moreover, you will get OBS-Camera. Therefore, you have to click on it.

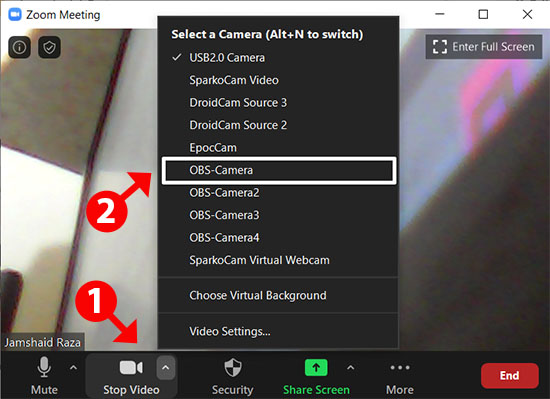
Student Zoom Camera Selection
Step 7. Use DSLR Camera as a Webcam For Skype.
Skype is also one of the best messengers. Where most of the people use for communication. Therefore, using the best DSLR camera as a webcam will give more amazing quality to the viewer to whom you are talking.
Therefore, I will show below, how you can set up your skype to use your DSLR Camera as webcam.
1. You have to open skype.
But, remember you should not open skype from the app. But You have to open the main software. Because I have tested the webcam in the skype app which wasn’t working. But when I have started the main software it works flawlessly.
2. Now you have to click on setting to open

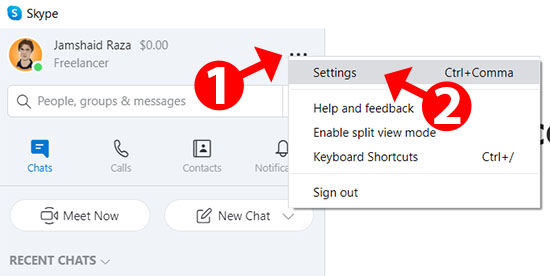
Skype Setting
3. Further, you have to select Audio & Video. Moreover, you have to select OBS-Camera.

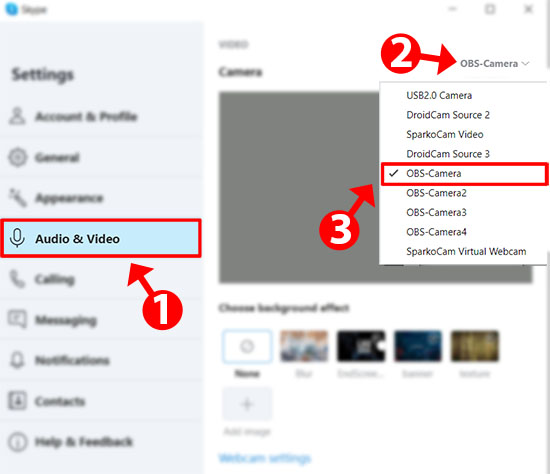
Skype Camera Selection
Now you are ready to use on any video call using skype. However, You can also change the background in skype easily.
Step 8. Use VirtualCam on Facebook Live
Most of people also use a DSLR camera on Facebook live instead of webcam. Therefore, we are going to use same method which we have already used for Skype and Zoom. Just follow the steps below.
1. First, you have to click on Live Video.

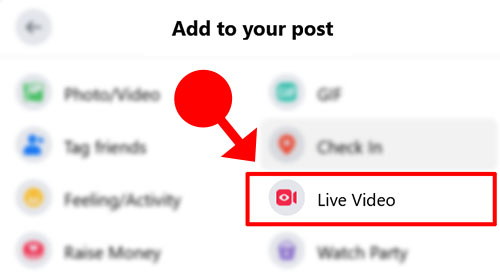
Facebook Live
2. Then you have scroll-down unlit you will see Get Started. Then there is an option for Use camera. You have to click on it. Further, you have Setup.

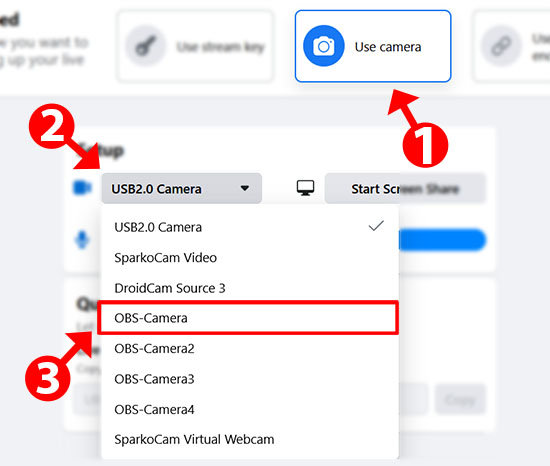
Facebook Live Camera Selection
3. There is an icon for the camera. You have to click on it and select OBS-Camera.
Now you are ready to go live with DSLR Camera on Facebook live.
Step 9. Video Guide
Here is a complete video guide. Watch the complete video and change DSLR Camera as a Webcam.

Why OBS VirtualCam as Webcam?
OBS is a very powerful software and you can make any changes in your videos using OBS software. Further, it is a free open source. Where you don’t need to pay anything.
Therefore, I personally recommend using OBS Studio VirtualCam. Where you can change your video background with professionalism. You also adjust all functionality in the video. Therefore, you won’t regrade using OBS VirtualCam.
Conclusion:
I hope you have complete information about how to use DSLR camera as a webcam. However, if you have any questions, comments, or suggestions. Don’t hesitate to ask in the comment box below. Thank you.