In this article, you will learn how to install macOS Catalina on VMware Windows 10 PC. Further, macOS Catalina is latest mac operating system. It is recently announced by World Wide Developers Conference 2019 or WWDC19, Apple Inc. Therefore, macOS Catalina will has superb improvement on the basis of operating system and applications. Therefore, testing and running it on virtual machine will give you batter idea about macOS Catalina.
In macOS Catalina there are many new features. However, one of the most amazing feature is to connect different devices with mac operating system. For example, you can connect iPad and use it as a second monitor.
Let’s directly dive into installation process to install macOS Catalina on VMware on Windows PC.
How to Install macOS Catalina on VMware Video
Follow the video tutorial below. And learn how to install macOS catalina on VMware.

Install macOS Catalina on VMware


Install macOS Catalina on VMware Windows 10
To install macOS Catalina on VMware you have to hold your breath. Because the procedure is lengthy. However, in the end when you will get your macOS Catalina directly running on windows 10 PC. Then that moment is existing. Therefore, check complete steps throughly that you must correctly install the operating system with error and problem.
Contents
- Step 1: Download macOS Catalina on VMware image
- Step 2: Install VMware Player
- Step 3: Extract Virtual Machine image
- Step 4: Patch VMware Player
- Step 5. New Virtual Machine
- Step 6: Configure New Created Virtual Machine
- Step 7: VMX File Configuration
- Step 8: Edit Virtual Machine
- Step 9: Play Virtual Machine to install macOS Catalina on VMware
Step 1: Download macOS Catalina on VMware image
First you have to download the macOS Catalina VMware image. Check out the link below to download.
Step 2: Install VMware Player
It is the perfect time to install Vmware player on Windows 10. First, you need the software to download. Therefore, check out the link below to download Vmware Player.
Now you have to simply install Vmware Player on your windows 10 Machine. The process is simple and easy. Once, you will start installation process. You will see a wizard. Which will guide you through out the process. Therefore, you may not find any difficulties to install Vmware Player.
Step 3: Extract Virtual Machine image
Next you have to extract virtual machine image. Therefore When the download completes. You will find that the file is in zip format. This is due to large file size. Further, zip file also arrange many files in one place. Moreover, it also helps to compress the file size for easy uploading and downloading procedure.
Therefore, you need special software for extracting the file. Check the download link below to download the software. Then you will be able to unzip or extract the virtual machine image on your windows PC.
Similarly, to extract the file you have to right-click on the zip file and there are many option. Where you will find Extract Here. Then you have to click on it and wait for the moment that the extraction should complete. Moreover, you will see the extract file on the same folder. Then you are ready to proceed further.
Step 4: Patch VMware Player
VMmware player is one of the best virtual machine in market out there. Therefore, we are going to install macOS Catalina on VMware Player.
However, by defualt you cannot install macOS Catalina on VMware player. Because, it won’t allow you. As, there is no option available on it.
Therefore, we need to patch VMware player. But, don’t worry. The process is simple and there is no complex steps to patch. First you have to download the patch tool from the link below.
There is a file by the name of Win-install.cmd. Once you have find it. Then you have to right-click on the file. There you will get an option Run as Administrator. Choose the option. Further, it will automatically install and patch VMvmware.
Once Patch tool has been installed. Then you are ready to install macOS 10.15 Catalina on VMware without any problem.
Step 5. New Virtual Machine
Similarly, you have to open VMware Player. Where we are going to create new Virtual Machine. Once Vmware player has been opened. Then you have to click on Create a New Virtual Machine.

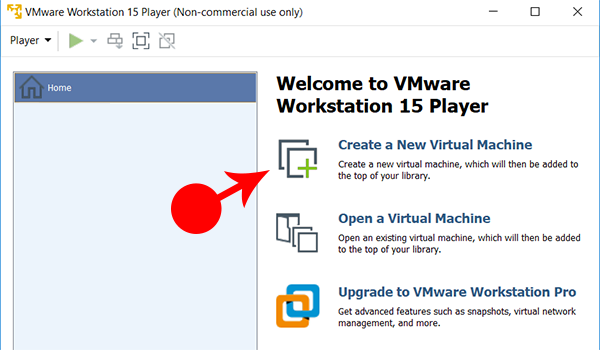
Create a New Virtual Machine
Further, you will find a New Virtual Machine Wizard will open. Therefore, this wizard will guide on each page for the correct configuration. However, don’t worry. I will also take you through all procedure step by step. Where you can configure everything. Just follow the steps below.
1. On the first page you will see Installer disc image file. Therefore, you have to I will install the operating system later. Then click Next.

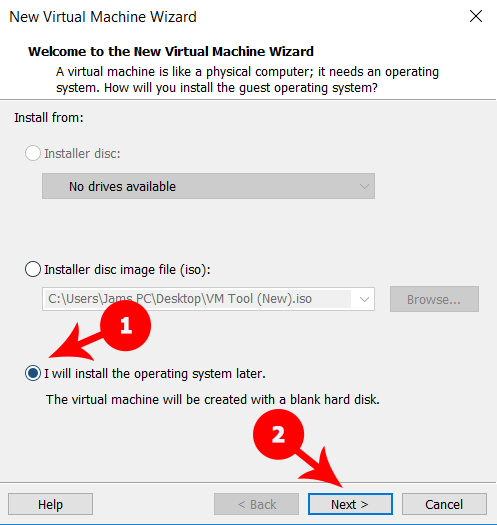
New Virtual Machine Wizard
2. Further, you have to select Guest operating system. There you will find like which operating system will be installed on this virtual machine. Therefore, you have to select. Apple Mac OS X. Then from the version drop down menu. You have to select macOS 10.14. If you are thinking that “man what you are doing! Don’t we install macOS 10.15”. Yes, you are right. We are install macOS 10.15. However, it won’t effect installation. Therefore, you shouldn’t confuse yourself.
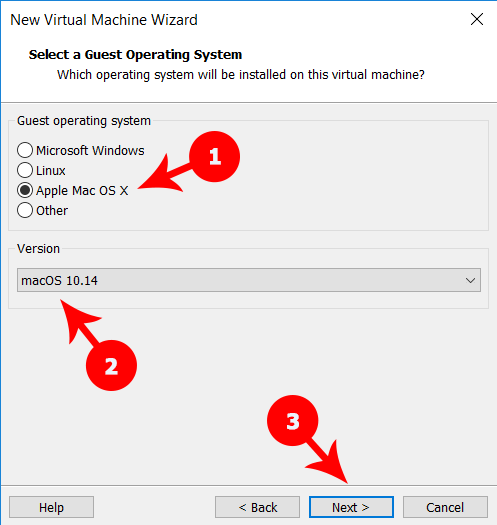
Select a Guest Operating System
3. Moreover, You have to Name the Virtual Machine. And save the location where you can your macOS should install. You can write any name which you want. However, the best practice is to name the operating system by the current version. For example MacOS 10.15 Catalina. It will give you batter idea that what is that operating system for. Further, you will find Therefore, you have to click on Browse… Then you have to select the file which you have already download for the macOS Catalina. Once you have selected the file. Then click on Next.
4. Finally, you have to Specify the Disk Capacity. Remember that the minimum requirement for the disk size is 40GB. Further, there is two more options which you have to select. Therefore, you have to select Store virtual disk as a single file. Then you have to click on next.
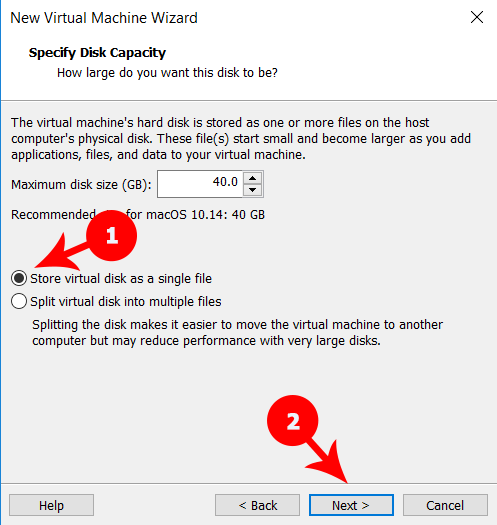
Specify Disk Capacity
You have successfully created New Virtual Machine.
Step 6: Configure New Created Virtual Machine
Now you have to configure newly created Virtual machine. These configurations will lead you for setting the memory, Processor, hard drive, CD/DVD (SATA) etc.
Therefore, let’s start step by step configuration from the guide below.
1. Edit Virtual Machine: First select macOS 10.15 Catalina from the Vmware player which you have created recently. Then on the right side you will find Edit virtual machine settings. Click on it to open.
Then you will see Virtual Machine Settings Window. There are two tabs you can see on top. Such as Hardware and Options. Therefore, we are going to configure hardware setting. It means you have to click on Hardware tab. Then you will get many options for hared on the right-side on the windows.
2. Memory: First you have to select Memory. Then on the right-side you will get options for the memory which you can configure.

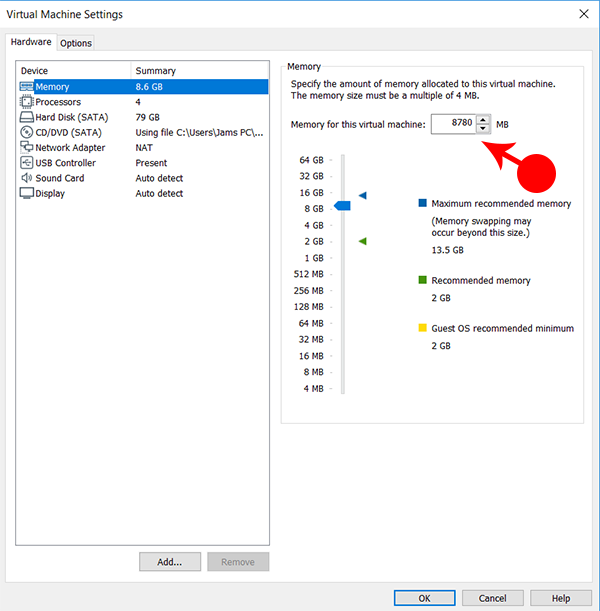
Memory setting
Therefore, you have to select 50% of your machine memory to macOS Catalina. For example, for my case I have 16GB or Ram. So, I have shared 8GB of RAM to virtual machine. Therefore, if you have 8GB Ram then you must share 4GB to Catalina OS
3. Professors: Now again on hardware tab you have to select Processor. Similarly, you have to share 50% of processor to virtual machine. I have 8 Core processor. Therefore, Number of Processor cores I have shared is four. Then leave all the setting as it is.
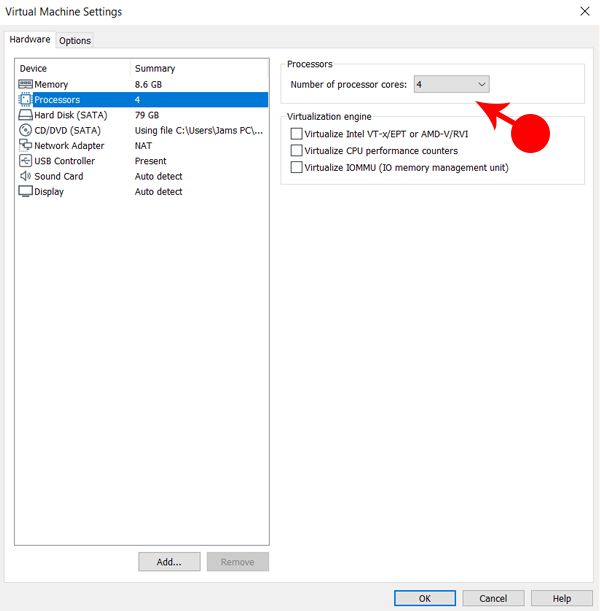
Processor Setting
4. Hard Disk (Sata): Next, you are going to select Hard Disk (Sata) from the hardware tab. Then you will find Remove. Button on the bottom of the hardware tab. Select Remove button. So, this will remove the virtual hard disk that was added on creating new virtual machine. Therefore, we don’t need that anymore.
Once you have removed the existing hard disk. Then you have to click on Add Button. Because, we are going to add macOS Catalina Hard Disk. On the disk type you have to click on SATA (Recommended) and click on Next.
Now you have to Select a Disk. There are three option available. However, you have to select Use Existing Virtual Disk. After that you have to click no Next.
Similarly, from the Select an existing disk page wizard. You have Click on Brows… Then you have to select the file which you have already download for the macOS Catalina. And Press Next.
That’s it for the configuration for the New Created Virtual machine to install macOS Catalina.
Step 7: VMX File Configuration
Now we are going to edit VMX File to install macOS catalina on VMware. For that you have to open the VMX folder. You have to right-click on the VMX File. Click on Open With and choose more apps. Then you have to select Notepad.
There you will find many coding. However, that is the file which control complete macOS Catalina on VMmware. Therefore, be careful while you are going to edit the file. You may not mistakenly change anything.
Copy the code Below
smc.version = “0”
Add it on the bottom of the coding and save the Note Pad by press Ctrl + S.
Step 8: Edit Virtual Machine
You have to open VMware. Then you have to click on Edit virtual machine settings. Then go to Options tab. You will see Setting > General.
Now change the following
- Guest operating system: Microsoft Windows.
- Version: Windows 10 x64
Then click OK.

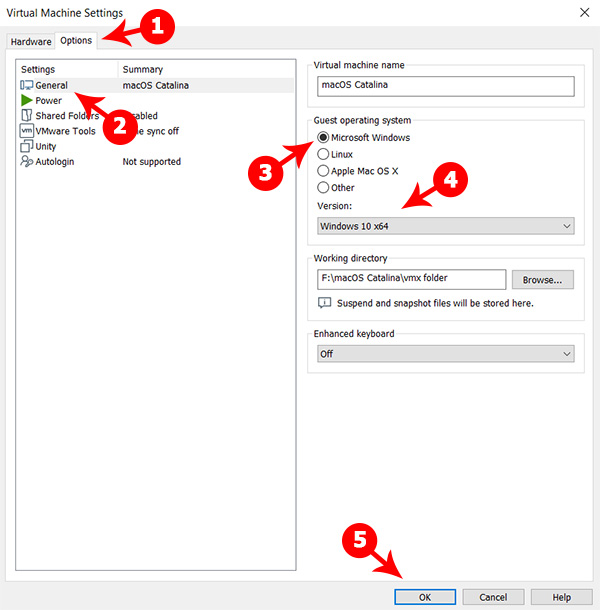
Virtual Machine Settings
Further, you have to play virtual machine. You will see installation will start. Then you have to wait for sometime that installation should complete. When the installation will complete. Then you have to turn off VMware.
You have to open VMware again. And go to Options Tab, Then change Guest and Version back again.
- Guest operating system: Apple Mac OS X
- Version: 10.14
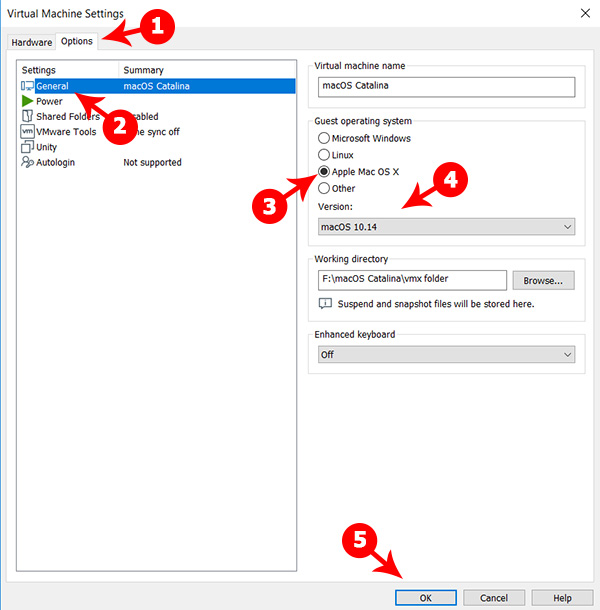
Virtual Machine Settings mac
Step 9: Play Virtual Machine to install macOS Catalina on VMware
Now you have to Play Virtual Machine. Just click on play and follow the steps below for complete installation.
1. You will see the Apple logo with black screen will appear. It means you are going to right direction.
2. The welcome Screen will display. Here you are going to register and set up your Mac. Therefore you have to click on Country and click Continue.

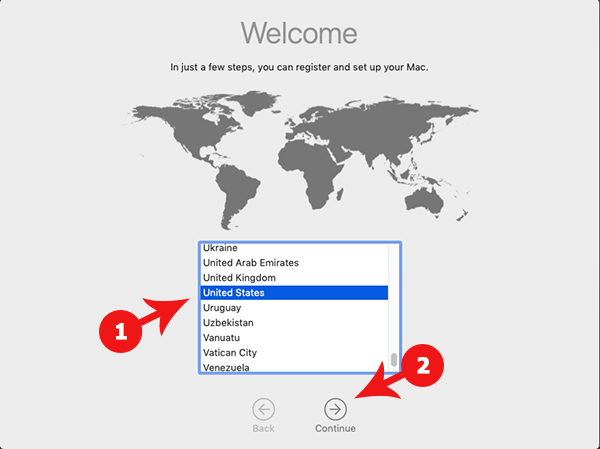
macOS 10.14 Mojave Welcome Screen
3. Next screen will ask you about to Choose a keyboard layout. Select U.S and click on Continue.

Select Keyboard
4. In this screen you will ask about the Data and Privacy. Therefore, read it carefully and the click on Continue.

Data & Privacy
5. Further, this wizard will ask you about Transfer Information to This Mac. It will ask that how do you want to transfer your information? Check the box on Don’t transfer any information now. and click on continue.

Transfer information to This Mac
6. At this stage, it will ask you about your Apple ID. As you know that with the help ID you can use many feature of macOS. Therefore, if you have any apple ID enter it. But, for you I will select Set UP Later and click on Continue.

Sign in With Your Apple ID
7. Finally, it will ask about Term and conditions. Simply click on Agree.

Term and Conditions
8. Create A computer Account. Fill out the following information to create your computer account.
- Full Name: Write you name.
- Account Name: It will select automatically.
- Password: write your password to log in in your mac. There password may be thing. Further, write same password in verify too.
- Hint: write something memorable about your password. When you forget your password. The the hint will help you to find it back.
- Finally, Press on Continue.

Create a Computer Account
9. on the page of Express Set Up just click on Continue.

Express Set Up
Congratulation, you have done great. Now at this screen it will setting up your Mac. It will take sometime for configuration. Then you will see your macOS 10.15 Catalina for the first time.
Also check out How to Install macOS Catalina on VirtualBox
Conclusion: I hope you have successfully Installed macOS Catalina on VMware. Further, if you face any problem do write in comment box below. We will be more then happy to help you thank you.