In this article, you will learn how to install Android Q on Windows 10. Android Q is the latest version base on android operating system. Therefore, updating android P or older version of your android operating system to latest version is one of the best idea.
Further, in this article we specifically guide you to install Android Q on windows 10. The reason is paramount to install it on windows. However, I will discuss in detail that why to install android operating system on Windows. But, every developer aware that with latest updates many new features will be added. Which would facilitate user to operate the system in more convenient way.
There are many ways you can install Android Q on windows. However, we are going to to install it with simple and easy method. Where you can get it without any problem and issue.
Moreover, one way is to install Android operating system on virtual machine. Secondly, there are some android emulator as well. Where you can install android operating system. Further, you can also use Integrated development environment (IDE) for testing and running android operating system and applications.
Therefore, for the purpose of this tutorial. We are going to use Android Studio an Android’s official IDE for installing android Q on Windows 10.
Install Android Q on Windows 10


How to Install Android Q on Windows 10
Let’s install android Q on Windows 10. Therefore, you have to follow the steps below with more clear understanding.
Contents
Step 1. Required Files to Install Android Q
First, you have to download some essential files to install android Q on windows 10. Therefore, I have provide the download links below. Where you can download the file one by one.
Step 2. Extract File
WinRAR is a software. Where you can extract the compressed file. It is free. Therefore, you can install and use that to extract the files.
However, if you have already install WinRAR. Then you don’t need to download and install it again.
WinRAR: Download
Step 3. Intel Haxm
Intel Haxm is one of the required file where you have to download it. However, When you will download the file. Then it is in compress format. Therefore, you have extract files. You have Simply click right-click on the file. Then you will get different option. However, you have to click on Extract Here.
Intel Haxm: Download
Once you have extracted the file. Then open the folder. There is many files. Therefore, you must find intellhaxm-adroid.exe. Then you have double-click on the file to install it.
Make sure you virtualization is enable from the BIOS.
Further, you have to a installation wizard will appears. Therefore, you have to simple install Haxm.
Step 4. Android Studio
Android Studio: Download
Once you have downloaded android studio. Then you have to install it on your windows 10 PC. However, when you will start the installation . You will get a Wizard. Simple follow the wizard on installation. Therefore, on each wizard page you have to click on Next.
Finally, you will get Verify Settings. There are different components of android studio which will be downloaded. Therefore, you have click on Finish.
It will take some time to completely download and install android studio component. Therefore, you have to wait installation should complete.
Step 5. Configure Android Studio
When the installation will complete. Then you have to open android studio. Further, you will see different option on Android Studio first page. However, you have to follow the steps below.
1. There is Configure button at the button of the page. Therefore, you have to click on it.

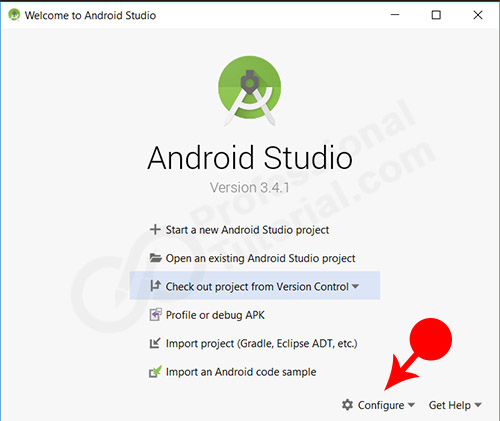
Android Studio Configure
2. Then you will see AVD Manager which is the first option on drop-down menu. Therefore, you have to click on it.
3. Further, you will get a button Create Virtual Device. Therefore, you have to click on it.

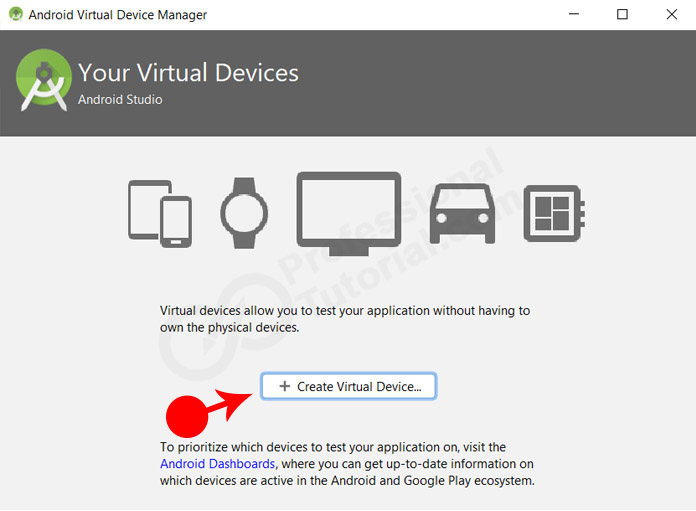
Your Virtual Device
4. Next, you have to select hardware. However, there are many devices from which you can select. But, I will let the default. Phone>Pixel 2

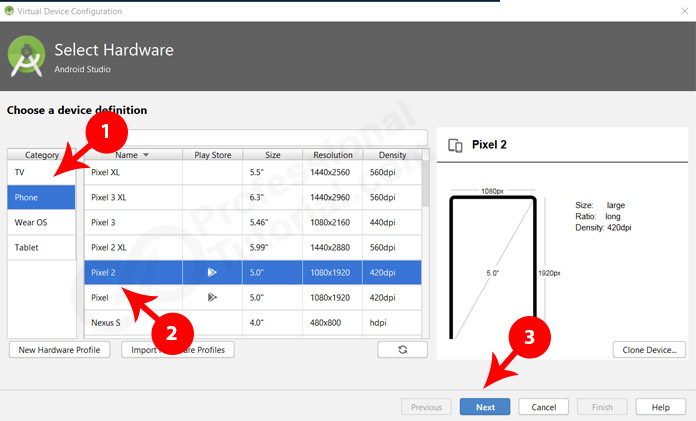
Select hardware
5. Now you will have to select a system image. On Recommended Tab. You will see Release Name. There is android Q. Therefore, you have to Click on Download in front of Q.
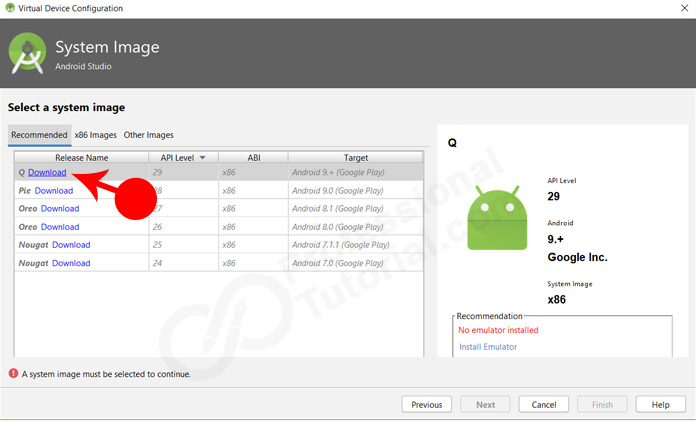
System Image
6. Then a new page will comes up. You have to click on Accept. Then Press on Next. Further, you have to wait for installation should complete.

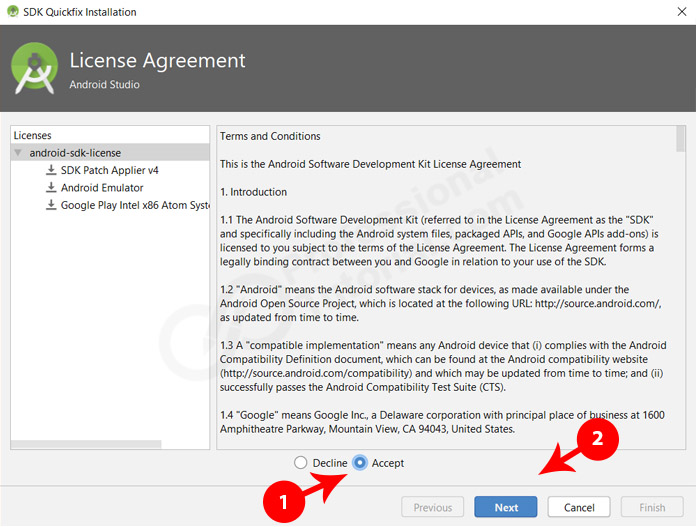
License Agreement
7. Finally, you have to click on Finish.
Step 6. Run Android Q
Now you are ready to Run Android Q. Therefore, when you hare going to click on Launch button. Then you will see an emulator will start. Therefore, you will see a mobile display screen with all configuration which runs Android Q.
Further, you can access all the application from the emulator. Similarly, you can also run and test your application which must be applicable with android Q.
Step 7. Check Android Q from setting
Simply, if you want to check if the android operating system versions. Then, you have to go to setting from the emulator. Therefore, you have to scroll down until you will see About emulated device. Then you have to click on it. Further, new page will comes up. You will see Android version. There you will also find 10 is written at the bottom. Therefore, the latest version of android operating system is Android Q Version 10.
You have to click on android version. Then on next page you will get again android version. You have to multiple click on it. Then Android Q will appears.
Why to install Android Q on Windows?
You may be thinking that, why we have to install android Q on windows? There are may reason behind installing Android Q on windows. First, when the new or latest operating system will release. Then, the developer will have to test it on third party software. Then cannot directly install in on phone devices.
Therefore, to test the applications and games on new android operating system. it is best practice to take it on third party software. Therefore, developer check all the bugs on that operating system installing on windows 10.
Android Q Features
Android Q has manifold features. However, the best one is New Safeguards to protect user privacy that you’ll need to support in your app. Since privacy is important for the users. Therefore, you have control on all application that which feature should be allowed. Therefore, you will be facilitate will enhanced privacy safeguards
Conclusion: I hope you find this article useful. However, if you want to add your opinion or suggestion. You are most welcome to write that in comment box below. Thank you.