In this article, you will learn how to set Ringtone on iPhone without iTunes. As many people nowadays are using Apple devices. It includes iPhone, iPad, iPod, Mac machines and laptops. But, you are aware that most devices need much more then it has while customizing. Therefore, Apple users are finding problems in so many tiny customization. For example, How to pause the video in between recording on iPhone. Further, most basic and essential requirement. Like how to customize ringtone on iPhone is not available.
Don’t worry, every problem has a solution. However, with some simple tweaks, we can make custom ringtone in your iPhone devices. Therefore, take your cup to coffee and let’s get straight into it.
Remember, that this trick will work on all iPhones. For example, if you have iPhone 11, X, Xs Max, 9, 8 ,7,6 or any model.
Set Ringtone on iPhone without iTunes


How to Set Ringtone on iPhone without iTunes Custom
Before to set ringtone on iPhone without iTunes. First, you have to understand what is iTunes. iTunes is also software by Apple. Therefore, with the help of iTunes, you can make various customization on your Apple devices. Similarly, you can update the operating system as well. Moreover, you can also transfer data from one device to another device. Therefore, iTunes is the key software that you are going to use most of the time.
However, iTunes is a software where you can only install that on a Laptop or desktop. Therefore, most of the people don’t want to use the software for such a basic task. Because unlike all android devices have very simple options available. Therefore, you can change your ringtone to a custom one. But, the iPhone is way too messy.
Therefore, in this article, we are going to try to set a song as a ringtone without iTunes.
also check:
- How to Install iOS 13 Beta Without Developer Account
- How to Control PC from Android Phone without Internet
How to Set Ringtone on iPhone
Ready to set the ringtone on iPhone. Oh yeah! Then follow the steps below to set ringtone on iPhone without iTunes.
Contents
- Step1: Download the Application
- Step 2: Make a Songs Your Ringtone from Library
- Step 3: Download Songs
- Step 4. Open GarageBand
- Step 5: Import Songs
- Step 6: Change Song Length
- Step 7: Trim the Song
- Step 8: Save Ringtone on your iPhone
- Step 9: Set Ringtone on iPhone from setting
- Step 10: make custom Text Tone on iPhone
Step1: Download the Application
First, you have to download the application on your iPhone. For that, you have to go to the App Store. Then you have to search for the application name GarageBand.
GarageBand is a free application. Therefore, you don’t need to purchase. Further, you have to find and install it on your iPhone.
Step 2: Make a Songs Your Ringtone from Library
Similarly, you can use any Songs from your iPhone library to make ringtone. Further, you can also download any song from the internet to make that ringtone. Therefore, there is no restriction. You can take any available options for both choices.
Step 3: Download Songs
If you want to download a song from the internet. Then you can simply write the name of the song with the extension of MP3. for example you can search “name.mp3“.
Then you have to download the song on your mobile. If you have an iPhone with iOS 13. Then you can see the song will download to the iCloud Drive.
Once you have downloaded the song. Then you can further proceed.
Step 4. Open GarageBand
Now it is the time where you have to open GarageBand. When you will open the GarageBand. Then you have to scroll until you will find Audio Recorder.

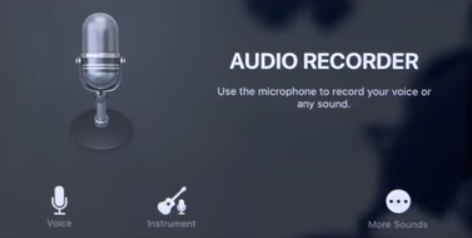
Audio Recorder
Then you have to tab on Audio Recorder. Further, you will see various options. Therefore, on the top left-hand, there is a grid-like icon. You have to tab on that.

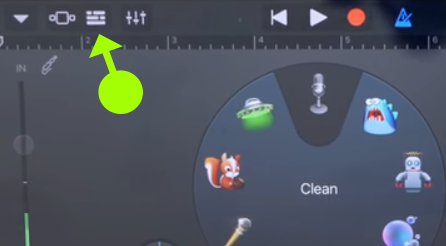
Timeline GarageBand
Before, importing the song you have to tab on the check-like icon. That will disable some annoying noises.
Step 5: Import Songs
Similarly, on the right-hand side. You will see an Omega-like icon. Therefore, you have to tab on that.

import songs
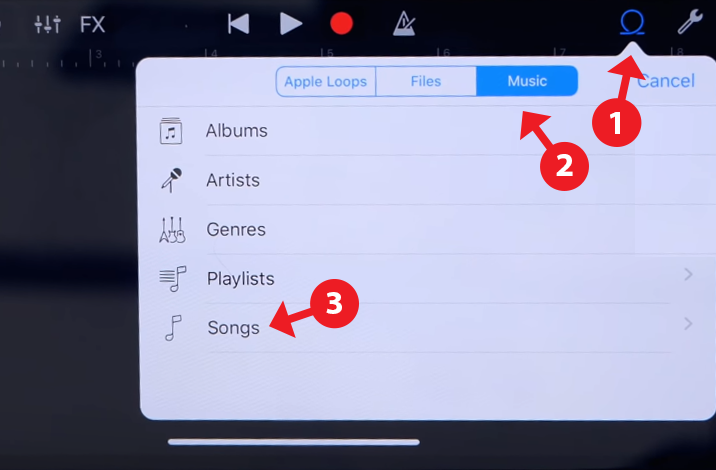
There are three tabs. Apple Loops, Files and Music.
Since the song which you have downloaded is in the Music Library. Therefore, you have to click on Music. Then you have Songs. Tab on that.
Then you can choose any song which you want to set as a ringtone on your iPhone.
However, if you have download the file from the browser. Then you have to click on Files. Further, at the bottom, you will see Browse items from the Files app. Therefore, you have to tab on that.

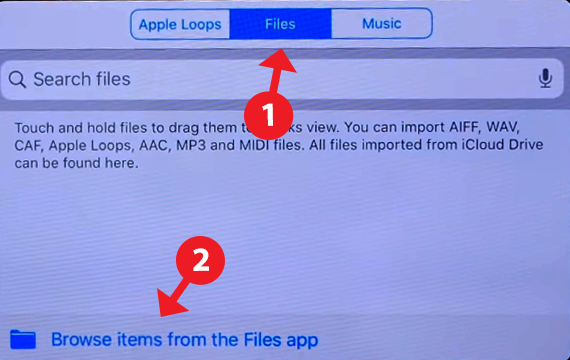
Browse item from the file
Now you have to see the song on the list. Otherwise, you have to click on Browse. Further, you can open the songs.
However, most of the time you can see the file in Recent. Then you have to open while tab on the file.
Then you will have to Tap and hold the file and drag the in the black space in the main GarageBand application.
Step 6: Change Song Length
Since the iPhone allows limited time for ringtone. Therefore, you have to click on the Plus icon.

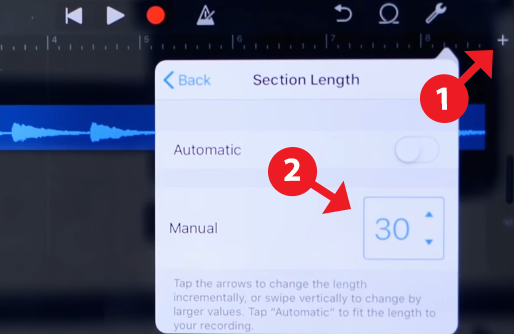
Section Length
Then you have the Song Selections menu. Therefore, you have to tab on Section A 8 bar.
Further, you have to turn off Automatic. Then change the Manual to 30. Which means your songs will be 30sec in duration.
Step 7: Trim the Song
Then song which may be a different length. Therefore, you have also adjusted the duration to 30 seconds. Therefore, you might miss your favorite part of your song. But, don’t worry. You can easily trim and fix the song with trimming on the timeline.
Therefore, you have to tab on the song on the timeline. Then you will get the Trim option. Therefore, you have to tab on Trim.
Next, you need to adjust the song on the timeline. Therefore, you have to hold the initial and final position to let the favorite part on the song in the ringtone.
Moreover, you can tab on Play. Further, listen if you have selected the right part of the song.
Step 8: Save Ringtone on your iPhone
Finally, it is time to save the song as a ringtone on your iPhone. Therefore, you have to tap on the top-left cover a small arrow icon. Then you will have to tab on the My Songs.

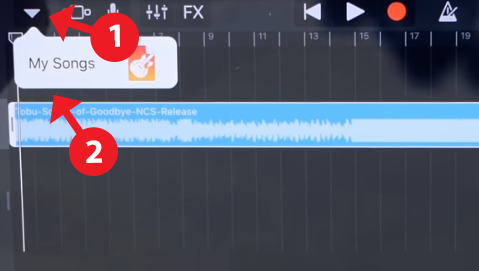
My Song Save to set ringtone on iphone
Further, you will see the file with the name My Song. Onward, you can also change the name of the file. While you can tap and hold on the file. Therefore, you will get the option to change the name.
Similarly, you have to tap and hold on the song file. And there is option Share. Then you have to tap on Share.
Then you have to select Ringtone.
Further, you have to tap on Continue.
Finally, you can rename your file and tap on Export.
Step 9: Set Ringtone on iPhone from setting
Now you have to go to the Setting of your iPhone. Next, you have to go to Sound & Haptics > Ringtones.
Finally, you can see your custom ringtone in on the top of the list. Further, to set as a ringtone on iPhone you have to tap on custom ringtone. And here you go. Now enjoy your own custom ringtone on iPhone.
Step 10: make custom Text Tone on iPhone
You can use the same method to make text tone on iPhone. Or the one which you have already exported as a ringtone. You can use that for the text tone as well.
Final Wards
iPhone is really one of the best phones out in the market. However, most of the people don’t like the iPhone due to it’s functionality. Because for some simple tweak. You need to go to the long process. Where in android devices. That could be possible with the basic procedure.
Therefore, if you are a tech guy. Further, you want many customization to your phone. Then it is better to use android devices. However, if you are the one who doesn’t care about the changes in your phone. then you can go with the iPhone.
Similarly, one more difference is free applications. Most of the applications on the iPhone as premium. It means you have to buy those applications. However, you can get a similar application for free in android devices. Therefore, if you don’t want to invest for expand on applications. Then best choice according to my observation is android devices.
Finally, what do you think which mobile phones are best according to your opinion? You can write that in the comment box below. However, if you have any question then don’t hesitate to ask me anytime. I would love to answer you. Thank you.