In this article, you will learn how to convert PNG to Vector Illustrator. As you know that Adobe Illustrator is Vector basis software. Which is widely use by paramount graphic designer. Moreover, it has every setting which any designer required. Therefore, with simple and easy steps you can make amazing designs.
Therefore, If you are looking to convert PNG to Vector. Then, you have many option. Either, you can convert that with free software. Or you have to use Adobe Illustrator. Remember that Illustrator is not free. Therefore, you have to buy the software. However, if you want to try that only one time. Then you have option for 30 days trail. Therefore, you have to download the software and use that for free for 30 days. But after 30 days if you like the software. Then you have to buy it. Otherwise, You cannot use the software onward.
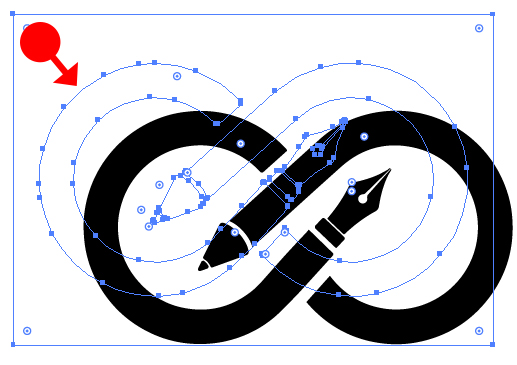
Convert PNG to Vector Illustrator


How to Convert PNG to Vector Illustrator
Follow the steps below to convert PNG to Vector in Illustrator.
Contents
Step 1: Run Adobe Illustrator
First you have to open Adobe Illustrator. You can simply click on Windows Start button. Once you see all options. Then you have to write illustrator. Further, you will see the icon of Adobe Illustrator. Simply you have click on it to run the program.
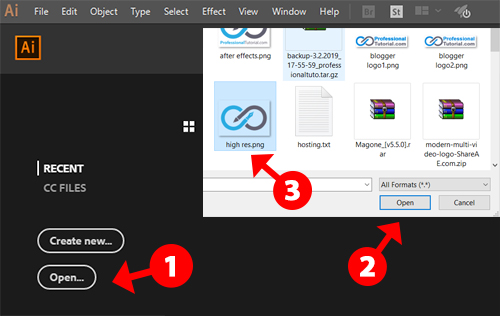
Step 2: Open PNG File
When you Adobe Illustrator will open. Then you have to click on open from the top menu. Further, browse the PNG file which you have to convert to vector.

Open & Browse PNG
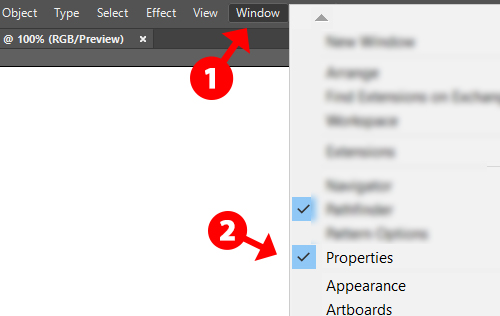
Step 3: Open Properties in Illustrator
Since, I am using Adobe Illustrator CC. Therefore, you can get the Properties as a separate dialog box. Most of the time Properties dialog box is on the right side. However, if you don’t find. Then you have to click on Window from top menu bar. And check Properties. Then you will see the Properties Dialog box on right hand side.
Properties Dialog Box
Step 4: Trace Image
Further, you have to select the image with Selection Tool. Then in Properties dialog box. You will see an option for the Image Trace. Therefore, you have to click on it.


Trace Image
Then you will get various options. However, you have to click on Default.
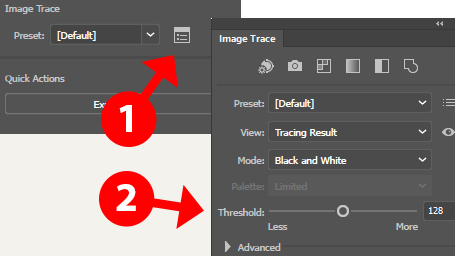
Step 5: Threshold Setting
Sometime when you click on trace image. Then you don’t need to change any setting. However, most of the time when you trace the image. Then you will get clean vector image. But, if you don’t get clean vector image. Then you have to adjust Threshold from Image Trace. For that you have to click on small icon near Preset. Then you will get Image Trace properties. Further, you can adjust the Threshold value to the required value. Where all the details of image should be clear enough.

Threshold Adjustment
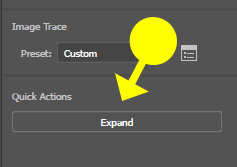
Step 6: Expend Image
Moreover, you need to Expend image. Therefore, Expend means, the image will convert to different sectors. Where you will delete all unwanted areas. You can find the Expand option on Properties dialog box under Quick Action. Therefore, you have to click on Expend.

Expend Image
Step 7: Clean Expand Image
Further, you need to clean the image. For the cleaning. You have to select Direct Selection Tool. Then you have to click on the area which you want to delete. Then you will see that will be selected. Moreover, you have simply which Delete on your Keyboard.

Clean Vector Image
Step 8: Match Color Final Vector
Finally, you have to match the colors of final vector. Therefore, you have to open original image and copy it on document which you have traced the image. Then you have to select Direct Selection Tool. Moreover, select each part of the vector and with EyeDropper Tool. You have to pick the the color from the original image.
If there are more then one color. Then you have to select each part one by one and color it from original image.
That’s it. Now you have successfully convert PNG to Vector Illustrator. Therefore, you can use that on any platform. Further, you can scale it to any size which you can. Since it is vector. Therefore, it will not loose it’s quality.
If you don’t know how to use Adobe Illustrator. The check Adobe Illustrator CC for beginners. you will learn Adobe Illustrator completely.
Convert PNG to Vector Illustrator Video Guide
Still you have trouble to convert PNG to Vector Illustrator. Then don’t worry. Watch step by step guide below. Where I have explained every steps.

Convert PNG to Vector Illustrator Drawback
What is the drawback of convert PNG to Vector Illustrator. Since, we have done all the above steps with the help of built-in option available in illustrator. Therefore, most of the time it is not useful. Because, when you will Trace Image. It will loose it’s quality. Therefore, you can’t not use Trace Image all the time.
Two reasons not to use Trace Image
There are two main reasons. Where you have not to use Trace Image. First, when image size it two small. While tracing the small size image Illustrator own get much information to convert it into vector with perfection. Therefore, it will drop the quality. Which you or your client will not like that.
Second. When there are two many details in image. Then it is difficult to Trace Image. Therefore, you will face hurdles on tracing these images.
How Convert PNG to Vector Illustrator small or detailed images?
You have only one option and that is Pen Tool. With the help of pen tool. You can manually drawn your logo and trace each line. Moreover, it is also one of the best option. When you don’t have to loose any small details. Or you want your logo must be 100% duplicate. Then you have to draw that with pen tool.
Also check: Free Stock Photos and Images For Commercial Use
Can You Convert PNG to Vector other then Illustrator?
Yes there are many software in market. Among them CorelDraw is also one of the option. However, the reason whey we are using Illustrator. Because, it is one of the best out of all the software. Therefore, you may not waste you time or all other software.
Conclusion: I hope you have learned how to convert PNG to Vector Illustrator. However, if you have any question, suggestion or feedback. Then you can write that in comment box below. Thank you.